Streaming For Couch Tour
“Streaming Video/Audio Connections for Couch Tour”
Introduction
This guide will hopefully provide some insight into getting your computer connected to your television and/or stereo receiver. First, before we get into the technical details, make sure that your computer and Internet connection are capable of streaming the video properly: Click on “Try Before You Buy” under show notes to stream a test video. If the performance is satisfactory, you should be able to stream the show and you can start hooking your computer up!
PC Users: What kinds of video cables do I need?
In order to determine what video cables you need, you have to first look at what kinds of outputs you have on your laptop or desktop, and what kinds of inputs you have on your television. Here are some of the common types of video inputs/outputs found on today’s computers and televisions:
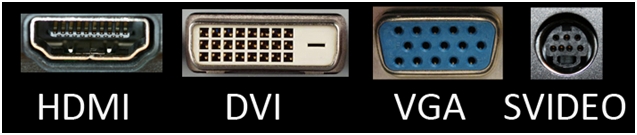
HDMI and DVI are both digital outputs and will result in the best picture quality on your TV. The main difference between these two outputs is that HDMI also carries audio, meaning you won’t have to connect any additional cables for the audio. VGA and S-VIDEO outputs are both analog and are the oldest of the video outputs, but will get the job done if this is all you have to work with. Nearly all high definition televisions will have an HDMI, DVI or VGA input, but if you’re using an older standard definition television, you are most likely going to be restricted to S-VIDEO (don’t confuse an S-VIDEO output on your computer with a PS/2 input for a mouse/keyboard. These are usually colored green or purple with a slightly different pin configuration). If you have a choice between any of these connectors, a general rule for quality/ease of setup is HDMI>DVI>VGA>S-VIDEO.
If you have the same port on both the computer and your television, you simply need a HDMI to HDMI, DVI to DVI, VGA to VGA, or S-VIDEO to S-VIDEO cable (same connector on each end).
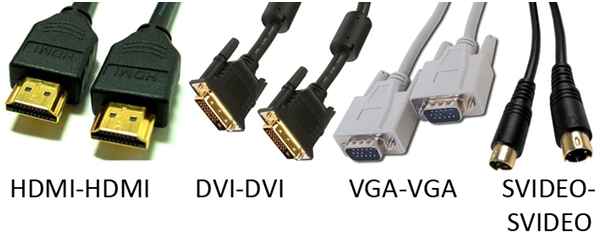
Most high definition televisions have HDMI inputs, so if your computer has an HDMI output, you should use the HDMI-HDMI cable. Additionally, if your computer has a DVI output and your TV has a DVI input, the DVI-DVI cable is a good choice, though you will need to hook the audio up separately.
If you don’t have the same connectors on your computer and television, this makes choosing the right cable a little bit more complicated. If your computer has a DVI out, but your TV only has HDMI (or vice versa), you can use an HDMI to DVI cable to connect the two.
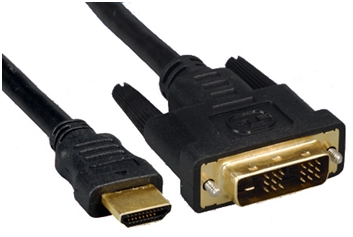
Keep in mind that since the output interface on the computer is DVI, it will not transmit audio even though the input on your TV is using the HDMI connection. If your computer has a DVI out, but your TV has a VGA input, you can use a DVI to VGA cable or a DVI to VGA adapter with a VGA to VGA cable.
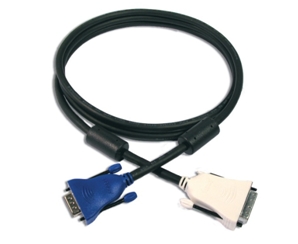
Be careful with these cables, as they will work if you are going from a DVI output to a VGA input, but not the other way around. These cables will not convert an analog signal into a digital signal.
Apple Users: What kinds of video cables do I need?
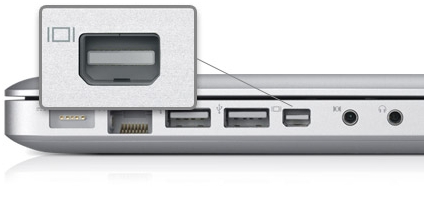
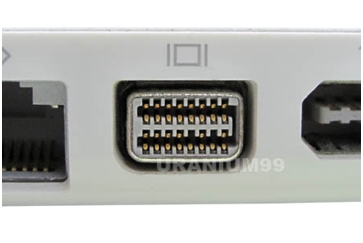
Newer MacBooks and MacBook Pros use a different type of connector called a DisplayPort, which is Apple’s own display connector designed to save space, since their laptops are quite thin.
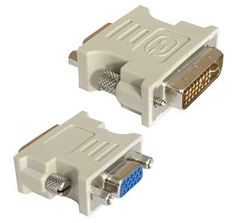
These can be connected to the ports mentioned above using Apple's Displayport-HDMI/Displayport-DVI/Displayport-VGA adapters. Apple’s DisplayPort, like HDMI, does transmit audio and may transmit it to your television with the correct DisplayPort to HDMI adapter, however this is not always the case. The older MacBooks use the DVI interface, but they use a different connector as well, called Mini-DVI.
Apple sells adapters that connect Mini-DVI to fullsize DVI and VGA. Just like their full-size DVI counterparts, Mini-DVI does not transmit audio.
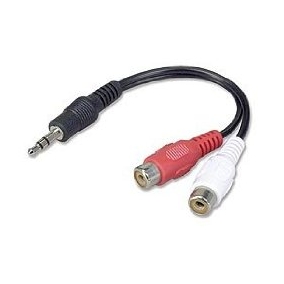
What kinds of audio cables do I need?
As mentioned previously, if you are connecting using an HDMI to HDMI adapter, the audio should be transmitted through the same cable to your television. If you are using any other type of cable to connect the video, you are going to need to run the audio separately. Nearly all computers have an 1/8 inch headphone jack to output the audio. The easiest way to connect your audio is to use an 1/8 inch headphone to RCA connector along with a regular stereo RCA cable to run these to the audio inputs on your TV or a separate receiver/sound system.
If you run into any problems with sound using an HDMI-HDMI cable, this audio solution should work as well.
PC Users: Configuring your computer to display correctly on your television
First, connect the cables and turn the TV on. Select the input the computer is connected to on the TV and turn your computer on. If you are using a desktop computer, the TV should display the information that would normally be displayed on your computer monitor. When the computer is completely booted up, locate the display resolution settings. Under Windows 7, you can find this by right clicking the desktop and clicking “Screen Resolution”. Under Windows Vista, you can find this by right clicking the desktop and clicking “Personalize” and then “Display Settings” at the bottom of the next window. Under Windows XP, you can find this by right clicking the desktop and clicking “Properties” and then clicking the “Settings” tab on the far right. Once you have located the screen resolution settings, you can make sure that the resolution is correct for your TV. If your TV is capable of displaying 1080p, this should be 1920x1080. If your TV is capable of displaying 720p, this should be 1280x720 pixels (if your TV says 1080i, configure it for 720p).
If you are using a laptop, some extra configuration might be required due because the laptop has its own monitor built in. The best option is to disable the monitor on the laptop so that you can use the native resolution for your high definition TV. Locate the display settings as explained above and there should be two monitors displayed. Disable the monitor on your laptop and enable your TV if it isn’t already and choose “Apply”. Once this is done, your laptop screen should shut off and you should get a confirmation dialog on your TV. Then, confirm the screen resolution as indicated above for either 1080p or 720p.
For S-VIDEO, you may have to enable the S-VIDEO output under display settings on your computer. The resolution also may have to be set as low as 640x480.
Apple Users: Configuring your computer to display correctly on your television
First, connect the cables and turn the TV on. Select the input the computer is connected to on the TV and turn your computer on. When the computer is fully turned on, open System Preferences either by clicking on the icon on the dock, or by clicking the Apple logo in the upper left hand corner and selecting “System Preferences”. It would be a good idea to click on “Exposé and Spaces” and uncheck “Enable Spaces” and “Show Spaces in menu bar” to avoid any potential display problems on your TV. Click “Show All” to return to the System Preferences dialog and click on “Displays”. Click on “Detect Displays” to make sure that your TV is detected correctly by OSX. Depending on your setup, the display may automatically be setup in mirrored mode (display on your MacBook is the same as what is seen on your TV) or extended mode (TV is an extension of your monitor on your MacBook). You want to use your MacBook in extended mode to avoid resolution conflicts, so if it isn’t already, click on the “Arrangement” tab and uncheck “Mirror Displays”. At this point, you can also move the displays around under the Arrangement tab to reflect the actual position of your TV relative to your MacBook. Now, return to the “Display” tab. You should have two separate dialogs that have display resolutions listed. One is for the resolution on your TV, while the other is for the resolution on your MacBook display. You shouldn’t have to make any changes to the display resolution on your MacBook’s display unless it looks funny since plugging in your TV (in this case, the highest resolution listed should be the native resolution for your monitor). To change the resolution for your TV, use the other dialog box (this one should have just two tabs, “Display” and “Color”). If your TV is capable of displaying 1080p you should set the resolution to 1920x1080. If your TV is capable of displaying 720p, you should set the resolution to 1280x720 pixels (if your TV says 1080i, configure it for 720p). Close the dialog settings, and you should be all set! You will have to move the internet browser window to your TV if it opens up on your MacBook display. Due to limitations in OSX, you will most likely have to leave your MacBook open while you are watching the stream, or else the computer will enter sleep mode.
Can I use my other internet-connected device to stream from LivePhish?
Apple TV: The Apple TV does not have a true internet browser, and thus does not support the LivePhish stream.
Nintendo Wii: As of this writing, the Wii browser does not support the plugins that are required to stream from LivePhish.
Sony Playstation 3: The internet browser on the Playstation 3 does support the LivePhish stream. If you are experiencing problems with the stream, you may have to clear your internet browser’s cache and cookies. With the internet browser open, press the triangle button on your controller. Select “Tools” and then “Options”. When the options dialog opens, select “Delete Cookies”, then “Delete Cache”, and then select “Yes” to confirm that you want to clear these. Then, return to the LivePhish site or refresh the page and the stream should work correctly again.
Xbox 360: Apparently, there are some internet browsers available for the Xbox 360, but currently these do not support the plugins required to stream from LivePhish.
Other internet-connected DVD/Blu-Ray players: Much like the Apple TV, these devices do not have true internet browsers, and thus do not support the LivePhish stream.
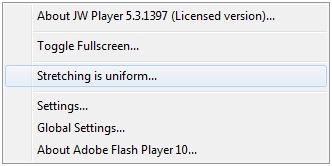
How do I get rid of the gray bands on the border of the video?
If you right click on the video, there is an option that says, “Stretching is uniform…”
Clicking on this option will change the way the video is stretched or scaled to fit the screen. There are about four options for this, but you can scroll through them and decide for yourself which looks best on your display.
Other things to keep in mind
If you are using a desktop computer, you are either going to need a network cable that will reach far enough or a wireless card installed if you have a Wi-Fi network in your home. Be sure to test the LivePhish example stream in the location where you will be streaming it. The wireless signal may vary in different locations throughout your home, so this is the only way to confirm it will be strong enough to have a reliable stream. Hopefully, this information has been useful in getting you connected. Happy couch touring folks!
 The Mockingbird Foundation